Docker跨主机通信之macvlan
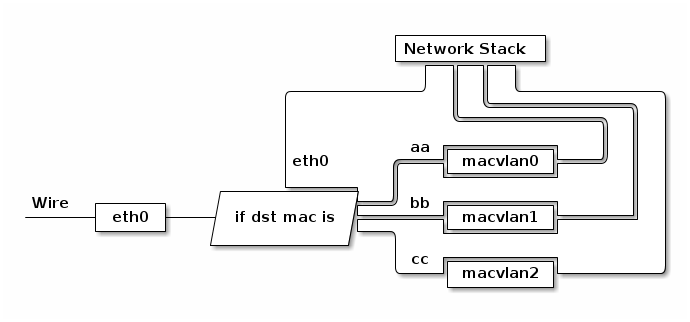
macvlan 本身是 linxu kernel 模块,其功能是允许在同一个物理网卡上配置多个虚拟网卡,即多个 interface,每个 interface 可以配置自己的 IP。macvlan 本质上是一种网卡虚拟化技术。
macvlan 的最大优点是性能极好,相比其他方式,macvlan 不需要创建 Linux bridge,而是直接通过interface 连接到物理网络。

0、准备实验环境
我们会使用 node1和 node2 上单独的网卡创建 macvlan。为保证多个 MAC 地址的网络包都可以从网卡通过,我们需要打开网卡的混杂模式。
ip link set enp0s3 promisc on
确保 enp0s3 状态 UP 并且 promisc 模式已经生效。
因为 node2 和 node3 是 VirtualBox 虚拟机,还需要在网卡配置选项页中设置混杂模式。
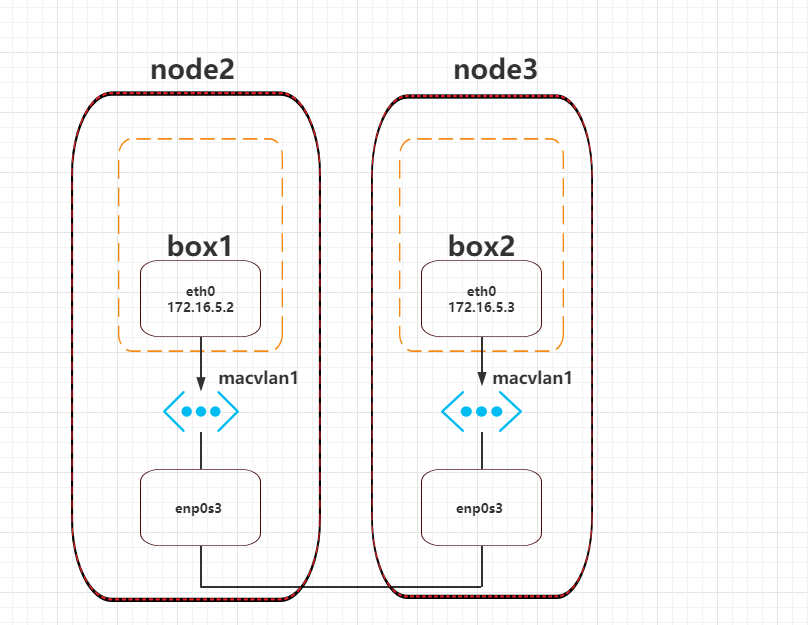
当前实验环境拓扑图如下:

1、相同 macvlan 网络之间的通信
分别在 node2 和 node3 中创建 macvlan 网络 macvlan1:
docker network create -d macvlan --subnet=172.16.5.0/24 --gateway=172.16.5.1 -o parent=enp0s3 macvlan1
这条命令中,
-d指定 Docker 网络 driver--subnet指定 macvlan 网络所在的网络--gateway指定网关-o parent指定用来分配 macvlan 网络的物理网卡
之后可以看到当前主机的网络环境,其中出现了 macvlan 网络:
docker network ls
NETWORK ID          NAME                DRIVER              SCOPE
2c49b5f1a0f2        bridge              bridge              local
1651b429a674        host                host                local
1d34c56c6448        macvlan1            macvlan             local
4f2664e6f883        none                null                local
在 node1 中运行容器 busybox1 并连接到 macvlan1。
docker run -itd --name busybox1 --ip=172.16.5.2 --network macvlan1 busybox
这条命令中,
--ip指定容器 busybox1使用的 IP,这样做的目的是防止自动分配,造成 IP 冲突--network指定 macvlan 网络
同样在 node2 中运行容器 busybox2:
docker run -itd --name busybox2 --ip=172.16.5.3 --network macvlan1 busybox
验证 busybox1 和 busybox2 的连通性。
busybox2 能够 ping 通 busybox1 的 IP 172.16.10.2
docker exec -it busybox2 /bin/sh
/ # ping 172.16.5.2
PING 172.16.5.2 (172.16.5.2): 56 data bytes
64 bytes from 172.16.5.2: seq=0 ttl=64 time=0.615 ms
2、不同 macvlan 网络之间的通信
macvlan 会独占主机的物理网卡,也就是说一个物理网卡只能创建一个 macvlan 网络,否则会报错:
docker network create -d macvlan --subnet=172.16.20.0/24 --gateway=172.16.20.1 -o parent=enp0s3 macvlan2
Error response from daemon: network dm-1d34c56c6448 is already using parent interface enp0s3
如果我们想创建多个 macvlan 网络就得用多张网卡,但主机的物理网卡数量是有限的。
如何支持更多的 macvlan 网络呢?
好在 macvlan 不仅可以连接到 interface(如 enp0s3),也可以连接到 sub-interface(如 enp0s33.100)。
注意
在交换机上,如果某个 port 只能收发单个 VLAN 的数据,该 port 为 Access 模式. 如果支持多 VLAN,则为 Trunk 模式.enp0s3 要接在交换机的 trunk 口上
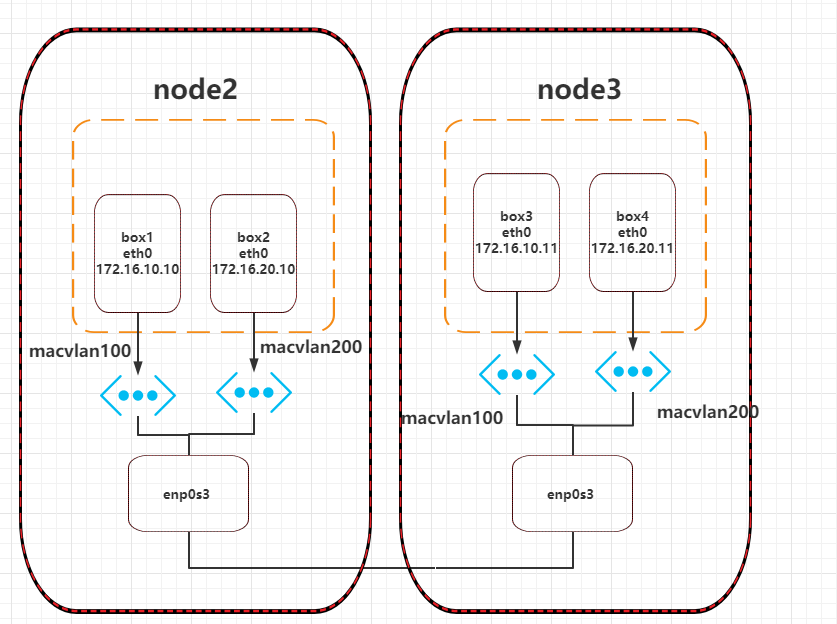
接下来,我们来看看不同 macvlan 网络之间的连通性,拓扑环境如下:

2.1 创建子接口
首先分别在两台主机上将物理网口 创建出两个 VLAN 子接口
配置vlan需要vconfig命令,由于centos7上没有自带vconfig命令,所以需要安装vconfig
#确认内核是够载入了802.1q模组
lsmod|grep 8021q
#如果没载入使用这个命令载入模组
modprobe -a 8021q
#配置epel源
yum install epel-release -y
#安装vconfig
yum install vconfig -y
#通过ip -a或者ifconfig -a查看是否生效
# 使用 vconfig 命令在 enp0s3 配置两个 VLAN
#node2 和 node3
vconfig add enp0s3 100
vconfig add enp0s3 200

# 设置 VLAN 的 REORDER_HDR 参数,默认就行了
#node2 和 node3
vconfig set_flag enp0s3.100 1 1
vconfig set_flag enp0s3.200 1 1

# 启用接口
# node2 和 node3
ifconfig enp0s3.100 up
ifconfig enp0s3.200 up
2.2 创建macvlan
分别在 node2 和 node3 上基于两个 VLAN 子接口创建 2 个 macvlan 网络,mac10 和 mac20
#node2 和 node3
docker network create -d macvlan --subnet=172.16.10.0/24 --gateway=172.16.10.1 -o parent=enp0s3.100 mac10
docker network create -d macvlan --subnet=172.16.20.0/24 --gateway=172.16.20.1 -o parent=enp0s3.200 mac20
2.3 创建容器
分别在 node2 和 node3 上运行容器,并指定不同的 macvlan 网络
# node2
docker run -itd --name box1 --ip=172.16.10.10 --network mac10 busybox
docker run -itd --name box2 --ip=172.16.20.10 --network mac20 busybox

# node3
docker run -itd --name box3 --ip=172.16.10.11 --network mac10 busybox
docker run -itd --name box4 --ip=172.16.20.11 --network mac20 busybox
通过验证,box1 和 box3,box2 和 box4 在同一 macvlan 网络下,互相可以 ping 通,box1 和 box2,box3 和 box4 在不同的 macvlan 网络下,互相 ping 不通。
[root@tuling2 ~]# docker exec -it box1 ifconfig
eth0      Link encap:Ethernet  HWaddr 02:42:AC:10:0A:0A
          inet addr:172.16.10.10  Bcast:172.16.10.255  Mask:255.255.255.0
          UP BROADCAST RUNNING MULTICAST  MTU:1500  Metric:1
          RX packets:0 errors:0 dropped:0 overruns:0 frame:0
          TX packets:0 errors:0 dropped:0 overruns:0 carrier:0
          collisions:0 txqueuelen:0
          RX bytes:0 (0.0 B)  TX bytes:0 (0.0 B)

lo        Link encap:Local Loopback
          inet addr:127.0.0.1  Mask:255.0.0.0
          UP LOOPBACK RUNNING  MTU:65536  Metric:1
          RX packets:0 errors:0 dropped:0 overruns:0 frame:0
          TX packets:0 errors:0 dropped:0 overruns:0 carrier:0
          collisions:0 txqueuelen:1000
          RX bytes:0 (0.0 B)  TX bytes:0 (0.0 B)

[root@tuling2 ~]# docker exec -it box1 ping 172.16.10.11
PING 172.16.10.11 (172.16.10.11): 56 data bytes
64 bytes from 172.16.10.11: seq=0 ttl=64 time=2.781 ms
64 bytes from 172.16.10.11: seq=1 ttl=64 time=1.106 ms
这个原因也很明确,不同 macvlan 网络处于不同的网络,而且通过 VLAN 隔离,自然 ping 不了。
但这也只是在二层上通不了,通过三层的路由是可以通的,我们这就来验证下。
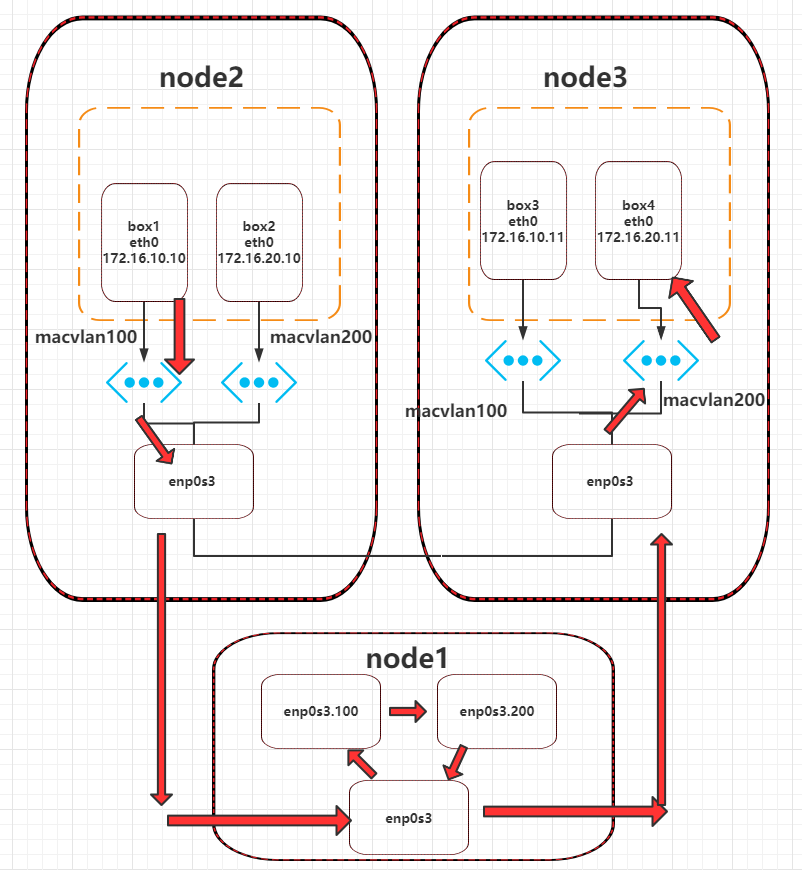
重新找一台主机 node1,通过打开 ip_forward 把它改造成一台路由器,用来打通两个 macvlan 网络,大概的图示如下所示:

2.4 开启路由转发
首先对 node1执行 sysctl -w net.ipv4.ip_forward=1 打开路由开关。
2.5 设置网关
然后创建两个 VLAN 子接口,一个作为 macvlan 网络 mac10 的网关,一个作为 mac20 的网关。
vconfig add enp0s3 100
vconfig add enp0s3 200
vconfig set_flag enp0s3.100 1 1
vconfig set_flag enp0s3.200 1 1

# 对 vlan 子接口配置网关 IP 并启用
ifconfig enp0s3.100 172.16.10.1 netmask 255.255.255.0 up
ifconfig enp0s3.200 172.16.20.1 netmask 255.255.255.0 up
2.6 设置IPtables
添加 iptables 规则,转发不同 VLAN 的数据包
 iptables -t nat -A POSTROUTING -o enp0s3.100 -j MASQUERADE
 iptables -t nat -A POSTROUTING -o enp0s3.200 -j MASQUERADE

 iptables -A FORWARD -i enp0s3.100 -o enp0s3.200 -m state --state RELATED,ESTABLISHED -j ACCEPT
 iptables -A FORWARD -i enp0s3.200 -o enp0s3.100 -m state --state RELATED,ESTABLISHED -j ACCEPT

 iptables -A FORWARD -i enp0s3.100 -o enp0s3.200 -j ACCEPT
 iptables -A FORWARD -i enp0s3.200 -o enp0s3.100 -j ACCEPT
这样之后再从 box1 ping box2 和 box4,就可以 ping 通了。
[root@tuling2 ~]# docker exec -it box1 ping 172.16.10.11
PING 172.16.10.11 (172.16.10.11): 56 data bytes
64 bytes from 172.16.10.11: seq=0 ttl=64 time=2.603 ms
^C
--- 172.16.10.11 ping statistics ---
1 packets transmitted, 1 packets received, 0% packet loss
round-trip min/avg/max = 2.603/2.603/2.603 ms
[root@tuling2 ~]# docker exec -it box1 ping 172.16.20.11
PING 172.16.20.11 (172.16.20.11): 56 data bytes
64 bytes from 172.16.20.11: seq=0 ttl=63 time=2.771 ms
64 bytes from 172.16.20.11: seq=1 ttl=63 time=0.833 ms
64 bytes from 172.16.20.11: seq=2 ttl=63 time=1.834 ms
下面我们分析数据包是如何从 box1(172.16.10.10)到达 box4(172.16.20.11)的。
我们在创建容器的时候指定了网关 172.16.10.1,所以数据包自然会被路由到 node1 的接口。看下 node1 的路由
[root@tuling1 ~]# route -n
Kernel IP routing table
Destination     Gateway         Genmask         Flags Metric Ref    Use Iface
0.0.0.0         192.168.1.1     0.0.0.0         UG    0      0        0 enp0s3
169.254.0.0     0.0.0.0         255.255.0.0     U     1002   0        0 enp0s3
172.16.10.0     0.0.0.0         255.255.255.0   U     0      0        0 enp0s3.100
172.16.20.0     0.0.0.0         255.255.255.0   U     0      0        0 enp0s3.200
172.17.0.0      0.0.0.0         255.255.0.0     U     0      0        0 docker0
192.168.1.0     0.0.0.0         255.255.255.0   U     0      0        0 enp0s3
可以看到,去往 172.16.10.0/24 网段的数据包会从 enp0s3.100 出去,同理 172.16.20.0/24 网段也是,再加上 node1 的 ip_forward 打开,这就打通了两个 macvlan 网络之间的通路。
总结
macvlan 是一种网卡虚拟化技术,能够将一张网卡虚拟出多张网卡。
在 Docker 中,macvlan 只支持 bridge 模式。
相同 macvlan 可以通信,不同 macvlan 二层无法通信,可以借助三层路由完成通信。